Finally the day has come that i’ve been working on reaching for ForgeRock. The day
that we proudly can say that we have a holistic Identity Management solution to tackle
not only the customer facing domain (CIAM) but the more interesting and challenging
Enterprise domain.
Having been an advocate for 9 years trying to get to the point where ForgeRock can
offer a holistic identity management solution solving our customers needs and problems.
The day has come! Forrester have estimated that the enterprise market for identity
management is approximately 5 times the size of the CIAM market. Thats great news,
since ForgeRock can now offer solutions addressing both aspects with confidence.
This post is about the addition of ForgeRock Access Review - our entrance into the
governance space providing two important features and capabilities.
- Being able to perform, in a scheduled and repeatable manner, entitlement certifications via attestation campaigns to collect and produce the necessary evidence requested by auditors to show compliance with legal requirements.
- Establish a solid Segregation of Duty framework to allow companies, not only to to be compliant, but to set up the necessary controls to avoid internal fraud and corruption.
Thrilling!
Now, this post is about the installation process so everyone in the ForgeRock eco-system
quickly can try out the new bits and learn its capabilities. Apologies for somewhat quick write
up but thought it was valuable to get the information out there on how rather than spend too
much time polish this entry. I will structure this in the following manner.
- Download all the prerequisites with links
- Install IDM and establish the right repository choice for ForgeRock AccessReview(IDG from here on)
- Install IDG
Prerequisites
The assumption is that you have the necessary environment to install IDM (Support OS and JDK).
- Download IDM (https://backstage.forgerock.com/get/familyId:idm/productId:idm/minorVersion:6.5/version:6.5.0.2/releaseType:full/distribution:zip)
- Download MySQL (https://dev.mysql.com/downloads/mysql/5.7.html)
- Download MySQL Connector (https://dev.mysql.com/downloads/connector/j/)
Install IDM
IDM Installation is trivial. Lets do the following (and i assume you are on a *NIX like operating system)
Unzip IDM-6.5.0.2.zip under /opt
# cp IDM-6.5.0.2.zip /opt
# cd /opt
# unzip IDM-6.5.0.2.zip
This create the IDM installation home. /opt/openidm
Repository
Now install MySQL according to Oracles instruction and for your OS. Start its service.
Let’s prepare the database to be a repo for IDM.
Following steps are needed in IDM to configure it to use MySQL as repo:
Locate the MySQL Connecto/J, unzip and copy the .jar file to /opt/openidm/bundle
- $ cp mysql-connector-java-version-bin.jar /opt/openidm/bundle/
- Make sure that IDM is stopped:
$ cd /path/to/openidm/
$ ./shutdown.sh
- OpenIDM is not running, not stopping.
- Remove the default DS repository configuration file (repo.ds.json) from your project's conf/ directory. For example:
$ cd /opt/openidm/my-project/conf/
- $ rm repo.ds.json
- Copy the MySQL database connection configuration file (datasource.jdbc-default.json) and the database table configuration file (repo.jdbc.json) to your project's conf directory:
$ cd /opt/openidm/
$ cp db/mysql/conf/datasource.jdbc-default.json /opt/openidm/conf/
- $ cp db/mysql/conf/repo.jdbc.json /opt/openidm/conf/
- Import the IDM data definition language script into MySQL:
$ cd /usr/share/local/mysql
$ mysql -u root -p < /opt/openidm/db/mysql/scripts/openidm.sql
Enter password:
- $
$ mysql -u root -p
Enter password:
Welcome to the MySQL monitor. Commands end with ; or \g.
Your MySQL connection id is 18
Server version: 5.7 MySQL Community Server (GPL)
...
mysql> use openidm;
Reading table information for completion of table and column names
You can turn off this feature to get a quicker startup with -A
Database changed
mysql> show tables;
+---------------------------+
| Tables_in_openidm |
+---------------------------+
| clusteredrecontargetids |
| clusterobjectproperties |
| clusterobjects |
| configobjectproperties |
| configobjects |
| genericobjectproperties |
| genericobjects |
| ... |
| schedulerobjects |
| schedulerobjectproperties |
| uinotification |
| updateobjectproperties |
| updateobjects |
+---------------------------+
Exit the mysql console.
mysql> exit
- Bye
- Create the IDM database user.
If you are running MySQL 5.7 or higher, run the following script:
$ cd /usr/share/local/mysql
$ mysql -u root -p < /opt/openidm/db/mysql/scripts/createuser.sql
- Enter password:
$ cd /usr/share/local/mysql
$ mysql -D openidm -u root -p < /opt/openidm/db/mysql/scripts/activiti.mysql.create.engine.sql
Enter password:
$ mysql -D openidm -u root -p < /opt/openidm/db/mysql/scripts/activiti.mysql.create.history.sql
Enter password:
$ mysql -D openidm -u root -p < /opt/openidm/db/mysql/scripts/activiti.mysql.create.identity.sql
Enter password:
- If you are planning to direct audit logs to this repository, run the script that sets up the audit tables:
$ mysql -D openidm -u root -p < /opt/openidm/db/mysql/scripts/audit.sql
- Enter password:
- Update the connection configuration to reflect your MySQL deployment. The default connection configuration in the datasource.jdbc-default.json file is as follows:
{
"driverClass" : "com.mysql.jdbc.Driver",
"jdbcUrl" : "jdbc:mysql://&{openidm.repo.host}:&{openidm.repo.port}/openidm?allowMultiQueries=true&characterEncoding=utf8&useSSL=false",
"databaseName" : "openidm",
"username" : "openidm",
"password" : "openidm",
"connectionTimeout" : 30000,
"connectionPool" : {
"type" : "hikari",
"minimumIdle" : 20,
"maximumPoolSize" : 50
}
}
Note: Ive added useSSL=false since i am just setting up a quick demo environment in this exercise.
Specify the values for openidm.repo.host and openidm.repo.port in one of the following ways:
- Set the values in resolver/boot.properties or your project's conf/system.properties file, for example:
openidm.repo.host = localhost
- openidm.repo.port = 3306
- Set the properties in the OPENIDM_OPTS environment variable and export that variable before startup. You must include the JVM memory options when you set this variable. For example:
$ export OPENIDM_OPTS="-Xmx1024m -Xms1024m -Dopenidm.repo.host=localhost -Dopenidm.repo.port=3306"
$ ./startup.sh
Executing ./startup.sh...
Using OPENIDM_HOME: /opt/openidm
Using PROJECT_HOME: /opt/openidm
Using OPENIDM_OPTS: -Xmx1024m -Xms1024m -Dopenidm.repo.host=localhost -Dopenidm.repo.port=3306
Using LOGGING_CONFIG: -Djava.util.logging.config.file=/path/to/openidm/conf/logging.properties
Using boot properties at /path/to/openidm/resolver/boot.properties
-> OpenIDM version "6.5.0.2"
- OpenIDM ready
Installation of ForgeRock Access Review (IDG)
Make sure that IDM needs to be started prior to installing IDG, but we just did that.
Unzip AReview-2.5.2.zip and navigate to the directory it was unzipped.
Invoke ./install.sh
Follow the interactive installer:
# ./install.sh
Location of your IDM Installation (e.g. /opt/forgerock/openidm):
/opt/openidm
Location of your IDM project directory. If left blank, will use IDM installation directory.
(e.g. /opt/forgerock/openidm):
/opt/openidm
Location of your unzipped IDG-installer directory (e.g. /home/me/IDG-installer):
~/Downloads/accessreview
IDM URL (e.g. http://localhost:8080)
http://localhost:8080
x.x Version of IDM Installation (e.g. 5.0):
6.5
IDM Admin User:
openidm-admin
IDM Admin Password:
openidm-admin
Type of database (MySQL, MSSQL, Oracle, PostgreSQL, DB2):
MySQL
Is this the first server in the cluster (yes or no):
YES
The installer will print updates to the console until successful completion
After installation completes, the IDM server must be restarted
Now let us Enable Audit Event Handler: repo
a.Log into IDM as an IDM administrator
b.Navigate to the Admin View
c.Click on Configure System Preferences
d.Under the Event Handlers section of the Audit tab, click edit for the
RepositoryAuditEventHandler

Make sure its enabled and click Submit to Save.
There are two special use-cases you can enable and have to do so explicitly.
Event-Driven Certifications
- Navigate to /opt/openidm/tools/idg directory of the IDM installation
- Run the following command to enable event-driven certifications:
$ ./enableEventBasedCerts.sh
You will now be prompted for the file location of the IDM home directory. Enter
the absolute path. (/opt/openidm)
You will be given the option to choose which types of certifications to
enable event-based certifications for:
a.
1) ALL - This option will enable event-based certifications for all
supported certification types listed below
b.
2) USER - This option will enable event-based certifications for user
certs-only. The script will update the user object configuration in
the managed.json config file.
2) ASSIGNMENT - This option will enable event-based
certifications for assignment certs-only. The script will update the
assignment object configuration in the managed.json config file.
Type ALL and hit enter.
Now lets enable the second special use-case:
Reactive Policy Scans
1.Navigate to /opt/openidm/tools/idg directory of the IDM installation
2. Run the following command to enable event-driven certifications
$ ./enableReactiveScans.sh
You will be prompted for the file location of the IDM home directory. Enter
the absolute path. (/opt/openidm)
The script will update the ‘out of the box’ script at
openidm/bin/defaults/script/role/postOperation-roles.js
All installed and ready to go. Lets now just create a user in IDM with the
governance-administrator authorization role assigned to allow for configuration and
you can start playing.
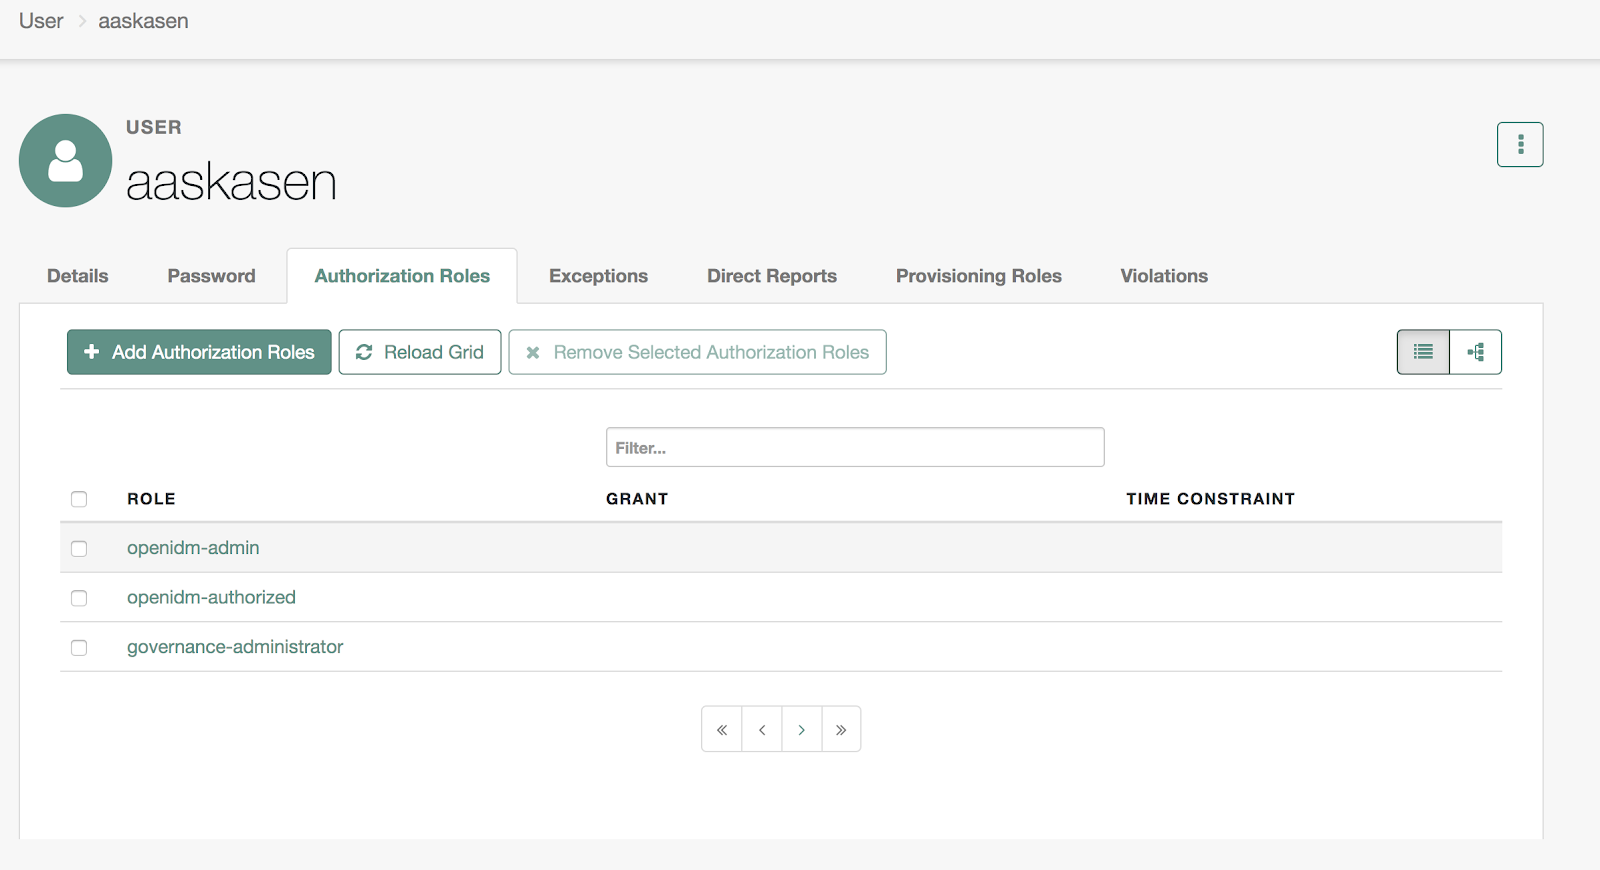
Now you can log out from the Admin console and login to the Governance module.
Point your browser to http://localhost:8080/governance/#/login
Voila! Enjoy!